Pages

Wednesday, December 18, 2013

Scottie Dog Pincushion

Hello!

I want to share a little pincushion I made.  I talk with my Grandma all the time about sewing.  She's the one who taught me how to quilt!  Anyway, I was telling her about all the awesome applique tricks I learned from this class.  She wanted to see some, so I made her a pincushion!


Grandma and Grandpa have always had schnauzer/poodles and so I thought a scottie dog was the closest to that!   I found it online and traced it onto my handy dandy HeatNBond Lite!!!  =)


I used a fun stitch on my Bernina to make a collar!

Then I just used a blanket stitch around the doggie and the circle.

I filled it with crushed English Walnut Shells which makes it awesome and heavy!


It's he cute???

TTFN,
Andrea

Friday, December 6, 2013

Another Taggie Blanket!

Howdy!
Taggie blankets are by far my favorite baby shower gift.  (can you tell?)  This one is for my best friend who lives in California.  Her daughter's name will start with an "M" hence the "M" applique.  However, I wasn't really thinking and now looking at the picture it looks like "W" and "M".  I should have angled both letters and had the top of the "Ms" closest to the center.  Oh, well.....


I asked what colors they liked and they came up with pink, turquoise, and grey.  HOW FUN!  So I used my very favorite Kona solid.... I can't remember the name of the grey, but I just can't get enough of it!!!!  I found the flower fabric in my stash.

I almost put the letter on the grey, but then I remembered the jar of yo-yos I had.  Don't yo-yos make everything better????   I think they do!  I don't know how they'll hold up in the wash, but at least it's cute now!!!


I hand stitched the yo-yos on.  In a brief moment of stupidity I thought that I could machine sew them on and have them look good.... not the case.  ha!

I LOVE doing the blanket stitch now!!!  I have a clear applique food (#39) that I just ADORE.  Also, I put the needle all the way to the rightmost position which makes it soooo much easier to ride along the edge of the fabric!  (That was a very helpful tip from the applique class I took at Thimbles.  Thanks Tory!)


There's just no reason to make a taggie blanket if you aren't going to put minky on the back!!!  Don't you love how I'm always making things last minute and I don't even take the time to clean off the 'trash' on my cutting table?  Oh, well.  Someday I'll be organized!!!

Do you want to make a taggie blanket?  Check out my tutorial here!

What do you like to make for baby shower gifts?

ttfn,
Andrea

Monday, December 2, 2013

Denim Jeans Quilt for my Hubby!!!

Hello Party People!

As most of you know:  I love making things!  Usually I craft/sew for gifts or baby showers or whatever.  My poor husband is so neglected because I've only made him a couple items.  He's really been wanting a big heavy blanket for his lazy boy.  So of course it had to be a jeans quilt.

I researched different tutorials online and didn't really like any of them.....  There were so many wonderful and beautiful quilts, but I was NOT interested in quilting this.  (I saw pictures of poor women using pliers to pull their needles through the denim!  I am just not that dedicated!!!)  I also saw tutorials of people who made intricate designs and matched corners... again I'm not that dedicated!  I bow down to those hard working quilters!!!

After thinking about it long and hard (and believe me I had plenty of time because it took FOREVER to cut up the jeans) I decided how I was going to make this quilt!


comfy and cozy in his chair!!!

I made this using the 'quilt as you go' method that I learned from doing bargello.  It worked out beautifully!  I didn't fight with the quilt and it came together very quickly.  The columns were 72" long and I tried to mismatch colors when I sewed them together.

I used flannel for the middle and back.  I feared that batting would be too thick.  My hubby says the weight of it is just right!

He did help me put the layers together and pin everything.  =)


For the binding I brought the backing to the front and sewed it down.  I mean, why should I make binding and deal with extra layers when I don't have to???  easy peasy. 
(don't you love the grass stains?  these jeans are the real deal.)


I LOVE my long table.  I don't know what I would do without it!

He wanted baby blue for the back and it looks nice!


Oh pretty jeans.  Yeah... most of these were from my college years.  I literally have always been saving jeans to make a quilt.  I honestly don't think I've ever thrown a pair out (gasp!).  I'm sure it was because secretly I knew I would be making a blanket out of them for my future husband {ha}!  If only he knew the bars and clubs places these jeans have been.....


again, loving my long table...  The finished quilt size was around 72" x 64".

another picture for no reason
(I should probably edit out the mess in the background, but I guess it adds to the charm... or something...)


On the back you can see the stitching lines.  I used a variegated blue thread that I think looks pretty good.


 Isn't he so cute and snuggly?  

I really enjoyed making this quilt and I didn't see anything like it online.  I'm thinking of creating a pattern for purchase while on my break from school.  thoughts?

Have a great week!!!
~Andrea

Wednesday, November 27, 2013

Taggie Blanket & another Pillow


We all know that I just love making taggie blankets.  They are so fun and happy!!!  I made this one for my best friend's new baby.  I added his initial for fun.  I am just loving applique right now!!!!
 

Since the taggie blanket is really only around 16" square it doesn't really need quilting.  However, I tacked down the center and a few other places using some fun stitches.
 

As always, minky on the back!!!  =)
 

My blanket stitch works like a dream.  Also, I love my new applique presser foot.  It is clear and short and fabulous.  By putting the needle all the way to the right I can get the most perfect blanket stitch ever!  (That was a valuable tip I learned from the applique class I took last month at Thimbles!)
 

Do you want to make a taggie blanket?  Well then visit my tutorial here!!!
 

I also made a "big brother" reading pillow for the new big brother in the family.  He's 3 and just loves the movie Cars.  I found this minky type fabric in the remnants bin at Jo-Ann's.  I grabbed a 27inch pillow form and make a huge pillow!  It was a big hit!!!

Wednesday, November 20, 2013

Amy Butler Floor Pillow


 Last Christmas I made a really fun pillow for my niece.  It was a great project, and didn't take too terribly long to make.  I used the pattern from Amy Butler's book "In Stitches". 


The pattern was good, but required me to waste a ton of fabric because the dimensions didn't divide nicely into normal fabric cuts.  Rather than buy a ton more fabric than I needed, I improvised.  I put some minky in the middle and used up all of my fabric rather than buying twice as much as I needed and wasting a ton to get a single cut of fabric!  I think it came out great!!!  (As you can see Princesses are all the rage.)


One of the main reasons I made the pillow was because I had this fabulous Bernstein Bears print that I just couldn't cut up!!!!  It was perfect for opposite the Princesses.
 

I filled it with regular stuffing, and I'm sure at this point it is really flat.  I should probably restuff it!!!  I made some fabric buttons and tufted the pillow to keep everything in place.

All in all it was a hit with my niece.  Sorry for the bad pictures, but I forgot to take pictures before I gave it to her... so these pictures were in desperation at the end of the evening!!!

Just for fun we also got her a Princess book and a Bernstein Bears book!  =)
Happy Sewing!

Friday, November 15, 2013

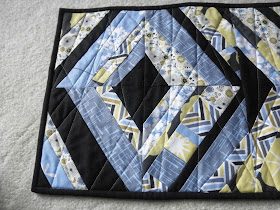
Madrona Road Table Runner

 The Modern Quilt Guild did a really fun challenge forever ago.  We received a package of fabrics from the Madrona Road collection by Michael Miller.  The only 'rule' was that we were to try a new technique.


I had been just LOVING Jacquie Gering's book Quilting Modern so I decided to do something from the book.  I have also always wanted to do a string quilt, and so I settled on the Fractured Quilt from her book.  Obviously this is just a small table topper, but I had a great time creating the squares to put it together!


As you can see I just straight line quilted it in all different directions.  All in all I think it turned out pretty cool.  These colors don't match my house at all so I gifted this runner to my brother and sister in law because it matched their kitchen!


I used the remaining fabric to piece the back!  tada!

Sunday, November 10, 2013

Winner!! Winner!! AGAIN!!!!

Yes, you read that right... I won AGAIN.... In the same week!!!!!!!!!!!!!!!
wow.  I should buy a lottery ticket!!!

I entered just about all of the giveaways for Sara Lawson's Purse Palooza.  She blogs over at SewSweetness and is just fantastic.  Her book Big City Bags just hit the shelves!  (It is on my Christmas wish list (link here) along with Tula Pink's Aurifil thread set (link here)hint, hint, wink, wink, family who reads my blog...... 

Did I mention that Sara lives in Chicago?  Yep, the best city ever.

 What did I win?  None other than FIVE Anna Maria Horner Bag Patterns!!!!!!!!!!!!!

 
 I'm going to make the Multi-Tasker Tote first.  I just have to figure out what fabric to use..... decisions, decisions.


 Then I'll make the "Sidewalk Satchel" because I just love the shape and the pleats!


Who doesn't need a clutch?


Too many to chose from!!!!  I definitely already cut out all of the pattern pieces for each of these.  I was watching TV with my husband and just started cutting!  Why?  Because there is nothing more annoying than wanting to sew a bag, and then have to cut pattern pieces.  Now when I'm ready to jump in, my patterns are too!!! 


This one looks awesome too!!  So many choices.....
Thanks Sara!!!!!!!!!!!!!!!!!!

Saturday, November 9, 2013

Winner!! Winner!!!!

OH MY GOSH!  
You know, you enter fun giveaways on blogs and never really expect to win.... and THEN YOU DO!!!!!!!!!!!!!!


I won an AWESOME giveaway from Leona's Quilting Adventure!!  She is celebrating her birthday month by GIVING AWAY gifts.  Wow.  Shouldn't she be receiving gifts?  Anyway, I was super excited to win!  You should go visit her blog! 

 Check out my loot!


I just LOVE the brush.  It is so great for cleaning out my machine, etc.  The Midwinter Reds are so pretty AND they come with a hexagon template!  Of course, there can NEVER be too many seam rippers in my sewing room!  =)


Here you see two fantastic patterns!  The one on the right is actually a quilt size reference card, but I have it turned the wrong way for the picture! whoops.....


We all know that everyone needs a Hello Kitty notepad!  It is most definitely in my purse right now!

Thanks Leona!!!!!

Friday, November 8, 2013

Pumpkin Table Runner!!!


Well!  I'm back!!  I'm really going to try and post ONCE A WEEK!  Wow... that seems like a big commitment now...  I think I can!  I have SOOO many projects to show you from the past year.  I've been sewing a bit here and there just no time for blogging.  Anyhow.... 


I'm going to start it off with my very awesome pumpkin table runner!!!  I LOVE THIS!  I started it not one, but TWO years ago.  I found the pattern from the Plaid Scottie. It is still available here on her website.  


 They are all 12" blocks of a scrappy log cabin.  I made 7 blocks because my dining room table is soo big.  It was super fun using up all of the orange scraps in my stash!!!


The beige fabric actually has music notes all over it!!!  I'm in love with this print.  I bought three yards of it, and sadly I'm almost running out..... I guess I'll just have to buy more!


I actually free motion quilted this on my fantabulous BERNINA.  I'm so in love with my machine.  sigh.  I started with the BSR, but then bailed on it.  It kept beeping at me.  I suppose I can just shut off the beep, but it seemed easier to just try my foot instead.  It worked pretty well.  The stitches aren't perfect, but no one at my house is looking that close. 


I tried my binding a new way!  I sewed it to the back and then brought it to the front.  I used my awesome #10 Edgestitch foot.  I know everyone says to use a walking foot for binding, but I just found my Edgestitch foot helped me be really accurate!   I'll be using that foot from now on.  It looks great on the back because the stitch is right in the ditch. (forgot a picture...sorry)
 

So what was I going to do with all the leftover scraps that didn't make the 'audition' for pumpkins?  They all went to the back!!!  No scrap was unused!


 I quilted with Aurifil thread.  It was so great!  I had a small spool and wasn't paying attention... and I ran out like 7 inches from the end!  I guess I should have FMQ'd bigger loops!!!  (The really amazing thing was that the spool and bobbin ran out at the SAME TIME. wow.) Anyway, I was so hell bent on finishing that I grabbed some other thread that mostly matched, and finished.  It turned out fine, but I definitely like Aurifil best!


Fun pumpkin!


Did you have any big finishes this week?????????