Tuesday, May 31, 2011

What to do when the lights go out.....


The power went out at 3pm today. After cleaning the craft room a bit, I cleaned the kitchen and then realized I wouldn't be able to do any of my email work. SO CRAFT TIME! I went and grabbed some scraps. The plan : Magnets. I saw some on a blog a few weeks ago (again, can't remember where...)
p.s. the pictures stink... T is helping me, but I'm a slow learner. I'll repost better ones with his help later. (edit: new pictures are up at the bottom and top of the finished magnets! I think they worked better! You can see more of the detail.)


The supplies: Glue, decoupage, glitter (duh), scraps, cardboard, magnets, needle and thread, or anything else you can find in your stash.


I used my flashlight for circle templates and cut out the cardboard!


"Laugh" contains thin paper strips, a diecut flower, all decoupaged together.

"joyful" contains paper but no decoupage.


"heart" is two peices of paper woven together. I just cut strips (not all the way through) and then weaved them together. A little bling never hurts. I drew a heart line around in preparation for some sewing.

"flowers" is two die cut flowers intertwined together.


Finishing touches.


For 'Laugh' I whip stitched pink and yellow embroidery floss around the edge.


For 'joyful' just a simple running stitch did the trick.


For "flowers" I buttonhole stitched around the edges.

For "heart" I backstitched a heart around the 'heart' and then added glitter to the edges.

I glued the magnets on the back and then DONE! =)

Have you made any magnets??  I would love to see them!

INSPIRATION

Thank goodness for the iPhone. I always have it with me to take pictures of great fun projects!!

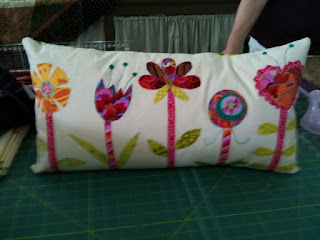
I saw this pillow at Thimbles! I can't wait to make one in its likeness. Applique is so fun!


Believe it or not this is a LAMPshade!! I saw it at HomeGoods. I'm going to make one for my craft room in different colors.

Monday, May 30, 2011

Cash & Carry Zipper Guys!


I made these for Christmas gift this past year! They are so easy to whip up because Cash & Carry is a fabulous pattern by Atkinson Designs. I've made all kinds of variations! It is quite possibly the best tutorial on zippers. After this you will never be afraid of zippers again. A friend of mine and I ordered a ton of zippers in bulk from ZipperStop.

My Somewhat DIY Wedding (part 2 of Infinity) : KANZASHI FLOWERS


This yellow satin one was my first try.

This is a pink satin one that I made for the flower girl dress.

The Flower on the dress with a matching satin sash that I
made from the same fabric.


The beautiful Flower Girl Dress above came with a very large flower that did not go with my wedding theme. I was looking for an alternative and I found the most fabulous Kanzashi Flower Tutorial at bitty, bits & pieces.
{addition: I sewed a circular piece of felt to the back of the flower and then hot glued a pin to the felt.  This way it can be worn with the dress, or on something else.}


I also made them for all of our siblings to wear as corsages. I tied them to ribbon, {edit: I actually used a hot glue gun to attach them to the ribbon.  I used a circular piece of felt for the back of the flower and then glued it to the ribbon.  Then the girls tied them to their wrists.}

My somewhat DIY Wedding (part 1 of infinity) : FLOWER PAPER CLIPS


The Front of the Paper clips.


The Back.


On Paper.


I wanted our wedding ceremony program to be one 8.5x11 sheet. We ended up doing a trifold "Z" fold style. We needed something to keep this accordian flat, and I just like extra flair! My husband and I looked up flower paper clips, and clips in the shape of flowers were VERY expensive. We had all of this extra paper, and some colored paper clips, and the right punches! My husband punched hundreds of little flowers while watching sports (I definitely married the right guy!) and some friends came over and helped me assemble these cute paper clips!!!

Hat / Scarf set


I found this FABULOUS yarn on sale and couldn't resist. How cute!?!?!
(The hat is crochet and the scarf is knitted.)

Baby Blanket

A bit of the color detail and pattern.


The whole blanket.


I made this baby blanket for my cousin. She hasn't received it yet, and good thing she doesn't know about my blog! This is THE SOFTEST yarn I have ever encountered. It's called Tinkerbell and can find it at Yarnmarket. The pattern came from a little booklet that I borrowed from a friend because I couldn't find it to purchase online. (She made the blanket for another friend of mine.) It was a pattern from the company that makes the yarn.

Hats for Donation


When my Grandma had cancer I went with her to one of her doctor's appointments. There was a box of knitted/crocheted hats for the patients to take on their way out. The doctor/everyone took such good care of my Grandma that I wanted to make some hats to contribute. It's been a while.... but I'm finally going to donate them this July!


After much hunting for a great pattern I found one! I love it because it is a basic shell and then has many different finishes. There were also instructions for some crochet flowers that I'll post pictures of later. I can't find the website with the pattern! I would love to give them credit, but I found this pattern long ago and printed it out!

My First Tote Bag!!!


So I'm still learning how to use a camera.... sorry.

I've always wanted to make a tote bag, but could never really find the right pattern. I decided to make one 'my own way' by combining a bunch of things that I've learned from various sources.

I made this bag quickly. Here's a 'sort-of' tutorial.....

~I cut out two large rectangles. One for the lining and one for the outside.
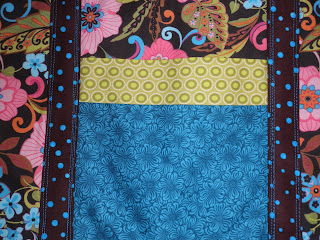
~I added two pockets on the outside (picture below). Instead of using two cut pieces for each pocket I made a large rectangle and folded it, placing the raw edges at the bottom. The less seams there are, the better!
~I added one pocket to the lining using the same technique.
~Then I used some fusible fleece and fused it to the outside fabric
~Next I stitched the lining to the fusible fleece. (Now I'm left with a rectangle that has two right sides and unfinished edges.
~I trimmed the edges and added a small binding to the top/bottom of the rectangle. (The shorter ends.)
~Next I sewed up the Sides using a "french seam" (as I'm told). I first matched the shorter ends with OUTSIDE sides together (lining facing out) (small binding touching at the top/ and a fold at the bottom). I stitched up both sides with a 1/4" seam allowance.
~THEN flip the bag inside out LINING sides together. Sew down the sides again about 1/4" from the edge. This gives you a 'finished' edge. Now the raw edge that you first created is tucked inside. You'll have a bit that sticks out, almost like a cording, but no raw edges.

STRAPS
~I made my own binding by cutting a very long strip that was 4" wide.
~I folded it in half and ironed.
~Then I opened it up and folded both sides to the center and ironed again.
~I used 1 inch wide twill tape to reinforce the straps. I put the timtex under the right fold and then put the left fold on top. I topstitched about 1/8 inch from the edge the whole length of the straps.
~I then stitched the straps to the entire bag.

LAST STEP....
~I made my bottom corners. I made a 'triangle' and then stitched it.... I can find a better tutorial for you if you need it.... I cut off the triangle and then zigzaged the edge to finish it. BUT SOON I'll have my new serger and I won't have to zigzag stitch things over and over again.


Now all I have to do is make a sturdy bottom for it. =)


Double Pocket


Hexagon!

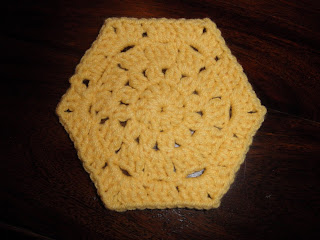
I've been wanting to make a bag like this one from FutureGirl. I figured it would be a good idea to try one hexagon first! I found a great tutorial here. I was just trying the stitches so I didn't change colors. (Currently I'm using it as a coaster.) Recently, FutureGirl put up video tutorials on how to make the bag! I can't wait to get started!

Thursday, May 19, 2011

Lilac Love

In an impromptu trip to my favorite quilt shop, Thimbles, I was glad to find bunches of precut "Lilac" Fat Quarters. It's a collection of fabrics entitled "Lilac Parade" by The Buggy Barn. The colors match my dining room perfectly. I plan to make a table runner and rug. I haven't decided on a pattern for the table runner yet, but the rug will be the Groovy Mama Rug. It looks like such a fun pattern I can't wait to get started! I learned about this great rug pattern from my other favorite quilt shop, Pieceful Heart Fabrics. (I'm allowed to have two favorites.)


Here's a sampling of some of the 18 Fat Quarters! The picture is not that good because I need a new camera, but you get the idea.


Wednesday, May 18, 2011

My First Post

I thought it would be fun to catalog the DIY/crafty/sewing/etc projects that I do when I have 'free time'.  I will be posting many of the projects I've been doing in the past year.  Come back soon!